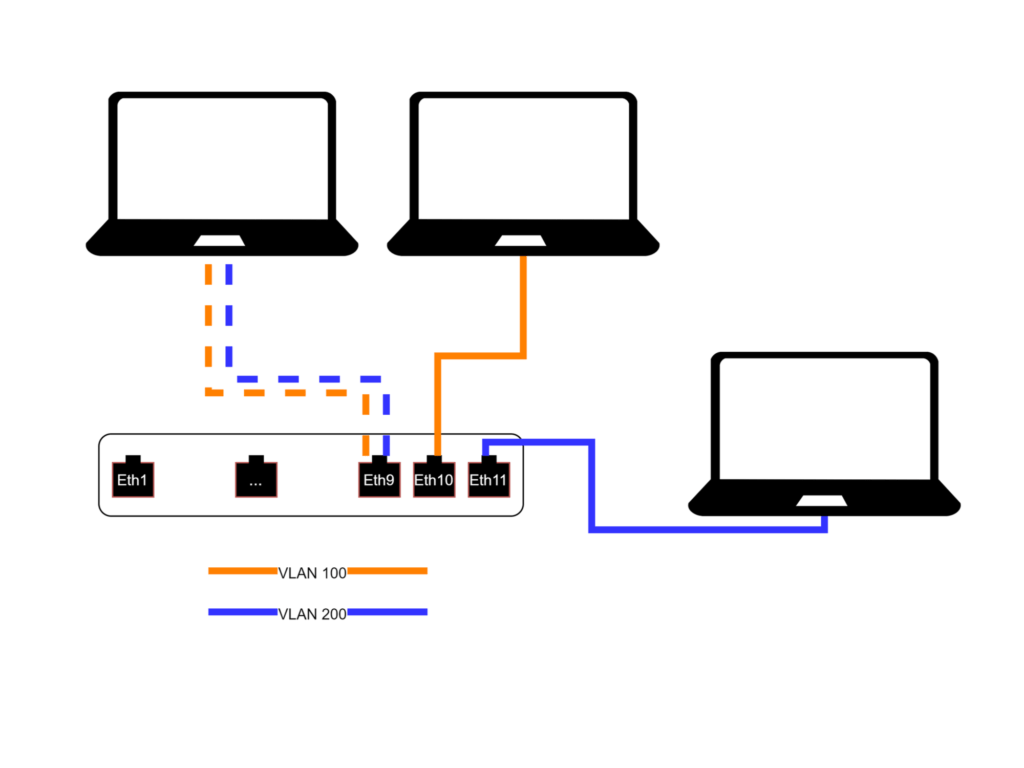
ในบทความนี้จะเป็นตัวอย่างการสร้าง VLAN บนอุปกรณ์ Mikrotik แบบเบื้องต้น ไม่ให้มีอะไรซับซ้อนยุ่งยาก เพื่อให้เห็นการทำงานว่าเป็นอย่างไรเท่านั้น. จากการทดสอบแล้วทำงานได้บน RouterOS รุ่น 7.11.
จากแผนผังเครือข่ายด้านบน จะเป็นการกำหนด VLAN ID 100 และ 200 ทั้งในแบบ tagged (เส้นประ) และ untagged (เส้นทึบ). โดยที่แบบ tagged นั้นมักจะนิยมนำไปใช้กับ network switch, access point แต่จากอุปกรณ์ทดสอบที่มีจำกัดจึงทดลองกับ laptop ที่มีการกำหนดหมายเลข VLAN ในเครื่องโน๊ตบุ๊คนั้นแทน. สำหรับแบบ untagged นั้นจะนำไปใช้ได้โดยตรงกับตัวอุปกรณ์ เช่น PC, NAS, เครื่องบันทึกกล้องวงจรปิด เป็นต้น.
เพิ่ม Bridge
ไปที่เมนู Bridge > คลิกที่แท็บ Bridge > กดปุ่ม Add
กรอกช่อง Name: bridge1 แล้วกด OK.
เพิ่ม Bridge ports
ไปที่เมนู Bridge > คลิกที่แท็บ Ports > กดปุ่ม Add
Interface: ether10
Bridge: bridge1
คลิกที่แท็บ VLAN
PVID: 100
Frame type: admit only untagged and priority tagged
กด OK
กดปุ่ม Add
Interface: ether11
Bridge: bridge1
คลิกที่แท็บ VLAN
PVID: 200
Frame type: admit only untagged and priority tagged
กด OK
กดปุ่ม Add
Interface: ether9
Bridge: bridge1
คลิกที่แท็บ VLAN
PVID: 1
Frame type: admit all
กด OK
เพิ่ม VLANs สำหรับ Bridge
ไปที่เมนู Bridge > คลิกที่แท็บ VLANs > กดปุ่ม Add
Bridge: bridge1
VLAN IDs: 100
Tagged: bridge1, ether9
Untagged: ether10
กด OK
กดปุ่ม Add
Bridge: bridge1
VLAN IDs: 200
Tagged: bridge1, ether9
Untagged: ether11
กด OK
เพิ่ม VLAN ให้ Interface
ไปที่เมนู Interface > คลิกที่แท็บ VLAN > กดปุ่ม Add
Name: vlan100
VLAN ID: 100
Interface: bridge1
กด OK
กดปุ่ม Add
Name: vlan200
VLAN ID: 200
Interface: bridge1
กด OK
เพิ่ม IP address
ไปที่เมนู IP > Addresses > กดปุ่ม Add
Address: 192.168.231.1/24
Interface: vlan100
กด OK
กดปุ่ม Add
Address: 192.168.232.1/24
Interface: vlan200
กด OK
เพิ่ม DHCP Server
ไปที่เมนู IP > DHCP Server > กดปุ่ม DHCP Setup
DHCP Server Interface: vlan100
DHCP Address Space: 192.168.231.0/24
Gateway for DHCP Network: 192.168.231.1
DHCP Relay: ไม่เลือก
Address to Give Out: ระบุขอบเขตที่เหมาะสมของคุณ
DNS Servers: 1.1.1.1 หรือ IP ของ DNS ที่ต้องใช้ อาจรวม IP ของตัวอุปกรณ์นี้เข้าไปด้วยถ้าหากใช้ร่วมกัน
กด Next ต่อไปจนเสร็จ
กดปุ่ม DHCP Setup
DHCP Server Interface: vlan200
DHCP Address Space: 192.168.232.0/24
Gateway for DHCP Network: 192.168.232.1
DHCP Relay: ไม่เลือก
Address to Give Out: ระบุขอบเขตที่เหมาะสมของคุณ
DNS Servers: 1.1.1.1 หรือ IP ของ DNS ที่ต้องใช้ อาจรวม IP ของตัวอุปกรณ์นี้เข้าไปด้วยถ้าหากใช้ร่วมกัน
กด Next ต่อไปจนเสร็จ
เปิด VLAN Filtering
ไปที่เมนู Bridge > คลิกที่แท็บ Bridge > ดับเบิลคลิกแก้ไขที่ bridge1
คลิกที่แท็บ VLAN
ติ๊กที่ VLAN Filtering
Frame Types: admit only VLAN tagged
กด OK
เป็นอันเสร็จสิ้นขั้นตอนทั้งหมด.
ทดสอบ
เมื่อนำ PC เช่น desktop, laptop มาเสียบที่ช่อง eth11 โดยที่อุปกรณ์นั้นไม่ได้กำหนด VLAN ID ควรจะได้ IP หมายเลขขึ้นต้นด้วย 192.168.232.x.
เมื่อนำ PC เช่น desktop, laptop มาเสียบที่ช่อง eth10 โดยที่อุปกรณ์นั้นไม่ได้กำหนด VLAN ID ควรจะได้ IP หมายเลขขึ้นต้นด้วย 192.168.231.x.
เมื่อนำ PC เช่น desktop, laptop มาเสียบที่ช่อง eth9 โดยที่อุปกรณ์นั้นกำหนด VLAN ID 100 หรือ 200 ควรจะได้ IP หมายเลขขึ้นต้นด้วย 192.168.231.x หรือ 192.168.232.x ตามลำดับ.
ในขั้นตอนนี้หากยังไม่สามารถออก Internet ได้นั่นเพราะยังไม่ได้กำหนด NAT masquerade เอาไว้ ซึ่งขั้นตอนเหล่านั้นเป็นขั้นตอนตั้งค่าออก Internet จะขอแยกไว้ต่างหากเพื่อให้อ่านและเข้าใจได้ง่ายเฉพาะที่เกี่ยวกับ VLAN ในเครือข่าย.
Code ตัวอย่างเต็ม
ในโค้ดต่อไปนี้คือคำสั่งแบบ text แทนที่จะทำทีละขั้นตอนเหมือนด้านบนแต่จะให้ผลลัพธ์เดียวกัน.
/interface bridge
add frame-types=admit-only-vlan-tagged ingress-filtering=no name=bridge1 \
    vlan-filtering=yes

/interface ethernet
set [ find default-name=ether1 ] name=ether1-gateway

/interface vlan
add interface=bridge1 name=vlan100 vlan-id=100
add interface=bridge1 name=vlan200 vlan-id=200

/ip pool
add name=pool1 ranges=192.168.231.2-192.168.231.254
add name=pool2 ranges=192.168.232.2-192.168.232.254

/ip dhcp-server
add address-pool=pool2 interface=vlan200 name=vlan200DHCP
add address-pool=pool1 interface=vlan100 name=vlan100DHCP

/interface bridge port
add bridge=bridge1 comment="access port, untagged" frame-types=\
    admit-only-untagged-and-priority-tagged interface=ether10 pvid=100
add bridge=bridge1 comment="access port, untagged" frame-types=\
    admit-only-untagged-and-priority-tagged interface=ether11 pvid=200
add bridge=bridge1 comment="trunk port" interface=ether9

/interface bridge vlan
add bridge=bridge1 tagged=bridge1,ether9 untagged=ether10 vlan-ids=100
add bridge=bridge1 tagged=bridge1,ether9 untagged=ether11 vlan-ids=200

/ip address
add address=192.168.231.1/24 interface=vlan100 network=192.168.231.0
add address=192.168.232.1/24 interface=vlan200 network=192.168.232.0

/ip dhcp-server network
add address=192.168.231.0/24 dns-server=192.168.231.1 gateway=\
    192.168.231.1
add address=192.168.232.0/24 dns-server=192.168.231.1 \
    gateway=192.168.232.1

/ip dns
set allow-remote-requests=yes servers=192.168.231.1,1.1.1.1